a southern girl's dialogue on life in the rockies

a southern girl's dialogue on life in the rockies.

cooking.baking.teaching.and general merriment.

6.21.2013

I really love my... {personalized ring}

(see here for all the previous posts in the I really love my... series!)

It's back! The I really love my...series is one of my favorites.

I think it's the Southern girl in me, but I love me a good monogram/personalization. Like, it's almost to the point where I need to be careful that I don't have a monogram necklace while carrying a monogram purse with personalized shoes.

Ok, I don't have personalized shoes but that could be cute.

My sweet husband (with prompting from my sweet best friend) gave me the perfect, personalized gift for my birthday this year. A stackable ring with the name of our precious little girl! Right up my alley.


Thin enough to stack with other names (husband, other kids, etc.) or your wedding rings and perfect for daily wear. I love looking down and seeing Charlotte's name everyday. It's oh so very special.

Click here to see all the gorgeous name and monogram ring options on Etsy!

It's good to give your bestie your husband's phone number for reasons like this,
Laura

6.17.2013

Bride + Groom Koozies

Some might say we are currently in the season of summer.

And I might say that those people are wrong.

It is most definitely Wedding Season!

With all the showers, bachelor/bachelorette parties and weddings over the next few months, this is a perfect, easy DIY project to celebrate the lovely bride and groom.


Hit up your local craft store for the following supplies:

2 koozies (I bought a pack of 6 for other projects and used a blue and pink for this project)
A small scrap of black felt (could use black ribbon, too)
Thin blue or white ribbon
Tulle
Hot Glue and a Hot Glue Gun

For the Groom:
Cut the felt (or ribbon) into two pieces. One piece about 1/2 in. x 6 in. and the second piece about 1/4 in. x 3 in. Fold the long piece in half, short end to short end and hot glue. Wrap the smaller piece around the center of the folded piece and hot glue on the back. Voila- a bowtie! Hot glue to the front of the groom koozie.

For the Bride:
I used a roll of tulle and layered it 3 times about 6 in. wide. Tie the thin ribbon into a bow 1/4 in. from the top of the tulle layers. This will create a small 1/4 in. amount of tulle above the bow. Fold that behind the bow and hot glue it to the koozie. Place a small dab of hot glue under the bow, onto the tulle, as well. Voila- a veil!

I made these without taking any pictures of the process so let me know if you have any questions or would like to see some pictures and I will work on that!

Also, let me know if you make some! I'd love to see your renditions!

Enjoy all your weekend wedding celebrations this summer!
Laura

6.14.2013

Father's Day Gift Idea

Father's Day is Sunday.

Nothing like last minute, huh?

I was making some other projects with koozies (see blog on Monday!) and had a great idea for a quick, cheap and simple gift to celebrate my husband's first Father's Day as this cutie's dad!

(shameless plug for my adorable daughter, I realize this)
 

I simply painted my daughter's palms with white paint I had on hand and pressed one on either side of the blank koozie from the craft store.
 
Side note: Although I said "simply", that probably isn't the best adjective to describe this task. It will definitely take two people to hold open your child's palm and paint it if you have a wiggly 7 month old that likes to clasp her hand around things during this stage. Have baby wipes handy and don't be afraid to get a little paint on your hands. If you get extra marks on the koozie or mess up, you can quickly wipe it off with a baby wipe and start over!


After some personalization and a fairly quick dry time, my daughter can now "hold" her daddy's cold drinks. Presh.
 
Time to get crafty!
Laura

6.13.2013

Butternut Soup with Coconut Milk

I have two food weaknesses.

Ok, I have more than two. But two that really stand out when it comes to savory meals.

If I'm at a restaurant and anything on the menu includes butternut squash or goat cheese, it's pretty much a no-brainer that I will get said item

If it includes butternut squash AND goat cheese? Shut the front door...or just the menu. Game over, that's what I will get.

Now that I think about it, I should have topped this soup with goat cheese. Next time, because there will be a next time.

A healthy, light, summer version of a hearty fall soup.

All whipped up in under 30 minutes. That's my kind of summer, weeknight meal!


Butternut Soup with Coconut Milk
Recipe from Cooking Light magazine, February 2013
Prep Time: 10 min. Total Time: 30 min.
Yield: Recipe states serves 8, We ate it as a main course and it served 4
 
Ingredients:
1 tbsp. olive oil
1/2 c. thinly sliced shallots
1 tbsp. minced garlic
1 tbsp. minced, peeled, fresh ginger
2 c. water
1/2 c. canned coconut milk
1 tsp. salt
1/4 tsp. ground red pepper
2 (12 oz.) pkgs. fresh cubed butternut squash (I found this in the produce section near the bags of broccoli, lettuce, etc.)
1 tbsp. fresh lime juice
Ground red pepper for sprinkling at end (optional)
2 c. rice, prepared
 
Directions:
1. Heat a large heavy saucepan over medium-high heat. Add oil to pan. Add shallots and sauté 3 minutes or until softened, stirring occasionally. Add garlic and ginger, sauté 1 minute. Add 2 c. water, coconut milk, salt, red pepper and squash. Bring to a boil. Cover, reduce heat, and simmer 20 minutes or until squash is tender, stirring occasionally.
 
2. Place squash mixture in a blender. Remove center piece of blender lid to allow steam to escape and secure lid on blender. Place a clean towel over top of blender to reduce splatter and blend until smooth. Stir in lime juice. Ladle into bowls and top each serving with about 1/2 c. prepared rice and a sprinkling of ground red pepper if you want extra spice.
 
Enjoy!
Laura
 
P.S. Leftover coconut milk? Use it to make a delicious smoothie in the morning with frozen fruit and spinach! 


6.11.2013

Rose Cake

This post could also be titled, "Ohmygosh I finally made this cake and I'm obsessed."

But I figured that was a little long.

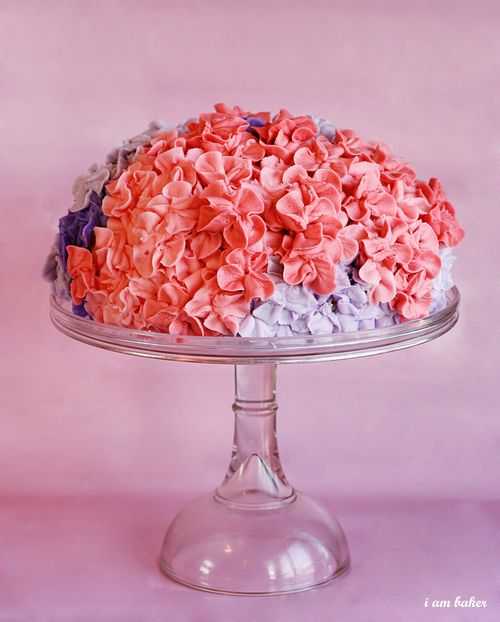
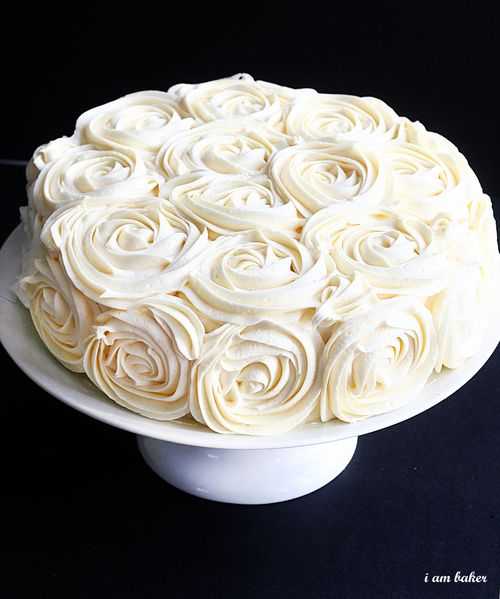
I'm a big fan of all things floral and since I first saw these gorgeous cakes by I Am Baker, I've been in love.

IMG_6416.stamp
 
IMG_9038.stamp
 
These are jaw-dropping, stunning cakes. Made at home!
 
I almost didn't write this post because I didn't want to give away my secret of how EASY this rose cake decoration is. But now you all know.
 
You don't have to tell anyone when you make it, though. It'll be our little secret.
 
Basically, make any cake that you want- chocolate, vanilla, funfetti, homemade, from a box- we are more concerned with the outside here!
 
When I made the rose cake, I made a two layer vanilla cake with a filling of chocolate frosting in between. And it was delicious, FYI.
 
I followed I Am Baker's directions for buttercream icing because it is thick and holds up well when piping the roses. Click here for the recipe. I also froze my cake before icing and applied a thin crumb coat to hide any holes in the rose decoration. For a one-layer of roses cake, I used the entire amount of frosting the recipe prepares. And I mean the entire thing. Like, I was so nervous I'd be one rose short-entire amount. So, keep that in mind!
 
I Am Baker has a great video to show you how simple and quick this frosting décor can be! All you need is a piping bag and a 1M size tip from the craft store!


I can't wait to try this rose frosting out on cupcakes, too! I have a little bit more practicing to do before I can present this as Charlotte's first birthday cake but that just means more cake for us to eat while I practice! Win, win, right?
 
Let me know if you try it out! Her patriotic cake in the video is perfect for 4th of July- right around the corner!
 
Now I want cake,
Laura

5.17.2013

Slow Cooker Week, Day 5

I'd never had a strata before. Doesn't it sound so fancy?

Well, I'm getting all fancy on y'all and I done made myself a strata!

Make this. And then when anyone asks what it is, make sure you answer so nonchalantly...or you could totally act like it's so difficult and reply with a deep sigh like you are so exhausted.

Little do they have to know that you made it in the slow cooker! Your secret is safe with me.

A strata is a bread, cheese and, in this case, veggie, compilation held together with eggs. A perfect addition to your weekend brunch, a bridal/baby shower or Christmas morning.


Spinach Breakfast Strata
Serves 10+ as a side, 8-10 as a main dish
Prep Time: 1 hr, including drying out bread
 
Ingredients:
1 loaf supermarket French bread, cut into 1/2 in. pieces  (12 cups)
2 tbsp. vegetable oil
1 onion, minced
2 garlic cloves, minced
1/2 tsp. dried thyme
10 oz. frozen chopped spinach, thawed
1 1/2 c. shredded Gruyere cheese (6 oz.)
2 1/2 c. half and half
9 large eggs
1 tsp. salt
1/4 tsp. pepper
 
Directions:
First, spread cut bread over rimmed baking sheet and bake until dry, about 40 minutes.
 
Heat oil in a skillet until hot. Add onion, garlic and thyme and cook until onions are soft, about 10 minutes. Stir in spinach.
 
Spread half of dried bread into slow cooker and sprinkle with half onion mixture and 1/2 c. gruyere cheese. Layer remaining dried bread, onion mixture and cheese. Whisk half and half, eggs, salt and pepper together in bowl, then pour mixture evenly over bread. Press gently on bread to submerge. Cover and cook 4 hours on low, until the strata is set.
 
Let strata cool for 20 minutes. If you would like to serve from a platter and not the slow cooker, you can line the slow cooker with either a crock pot liner or foil to make it easy to lift out with spatulas.
 
Enjoy!
Laura

5.16.2013

Slow Cooker, Day 4

Sometimes, you just want to throw things in a slow cooker, walk away and come back a few hours later and eat.

Is that too much to ask?

And sometimes, you don't want to go to the store and buy unique ingredients or dirty six bowls and pans before your slow cooker meal even starts to cook.

Here I am, saving the day. Here are five of my favorite ways to get dinner on the table without utilizing one brain cell to prepare. Lovely visual.


1. Throw in however many chicken breasts you need for your crowd at dinner that night, a packet of taco seasoning (or any Mexican inspired spices you have!), 4-8 oz. cream cheese (based on the chicken breasts amount) and a jar of salsa. As a bonus, if you have a can of corn or any beans on hand, feel free to throw those in, as well. Cook on low for 4-6 hours and shred to use in tacos, fajitas, taco salad or quesadillas.

2. Line the bottom of the slow cooker with sliced red apples, top with boneless pork chops, sprinkle with cinnamon and more sliced apples. Pour in 1/4 c. water for moisture. Cook on low for 4-6 hours. Serve with stuffing.

3. Same as #1, throw in however many chicken breasts your need for dinner that night. Pour one can Coke/Dr. Pepper/Pepsi/Root Beer (your choice!) and enough BBQ sauce over chicken until covered. Cook on low for 4-6 hours. Serve with mashed potatoes or shred for sandwiches, salad or chicken salad!

4. Line the bottom of your slow cooker with sliced bell peppers and a sliced onion. Pour about 1/2 cup-1 c. Italian salad dressing over the veggies. Once again, throw in those chicken breasts! (Can you tell we always have a bag or two of frozen chicken breasts in the freezer?) Sprinkle salt, pepper and cumin over the chicken. Cook on low for 4-6 hours. Serve as fajitas or in quesadillas! This is one of my favorites!

5. A twist on Thanksgiving! Dump a bag of frozen veggies in the slow cooker (peas and carrots are good), top with 4 chicken breasts, a can of cream of mushroom soup and a box of stuffing, prepared. Cook on low for 6-8 hours or high 3-4. A meal in itself! Maybe get some pie for dessert!

Let me know if you try any of these recipes! I think you'll find yourself rekindling your love affair with the slow cooker.

Enjoy!
Laura

5.15.2013

Slow Cooker Week, Day 3

Get ready- another super simple, slow cooker recipe comin' at ya!

In my resolution to try more of the recipes I pin on Pinterest, I found this little gem and loved it!

And it's only FOUR ingredients. Be still, my heart.

Crockpot Cranberry Chicken.
Crockpot Cranberry Chicken Recipe
 
Slow Cooker Cranberry Chicken
Recipe from The Frugal Girls
Yield: 4 servings
 
Ingredients:
4 boneless, skinless chicken breasts
1 can whole berry cranberry sauce (buy 2 so you can have it on hand to use the other half of the dressing and soup mix!)
1 pkg. dry onion soup mix
8 oz. Catalina salad dressing
 
Directions:
Cook chicken in slow cooker for 3 hours on high. Drain juices from slow cooker.
Mix together last three ingredients and pour over top of chicken. Cook on high for 30 minutes.
 
Serve with stuffing, over rice, quinoa or on a salad!
 
Enjoy!
Laura


5.14.2013

Slow Cooker Week, Day 2

When you have a baby, people bring you dinner. I wouldn't say it's the best part of having a baby (because then I'd sound like a horrible mom) but it's definitely up near the top of the list.

And then your best friend comes to visit and she not only cooks you dinner when she is there but puts something in the crock pot for you to have that night after she leaves. I'm lucky, I tell ya.

I've been remaking the Cashew Chicken on a regular basis over the past few months to rave reviews. It's simple, flavorful, unique and delicious!! All really great adjectives there.

I love that I only have to pick up a few ingredients at the store and already have the rest on hand, ready to go.


Slow Cooker Cashew Chicken
Recipe slightly adapted from Six Sisters' Stuff (super cute sisters!)
Yield: 4-6 servings
 
Ingredients: 
2 lbs boneless, skinless chicken breast tenders
1/4 cup all purpose flour
1/2 tsp black pepper
1 Tbsp canola oil
1/2 cup soy sauce
4 Tbsp rice wine vinegar (I've used apple cider vinegar when I don't have rice wine on hand!)
4 Tbsp ketchup
3 Tbsp brown sugar
2 garlic cloves, minced
1 tsp grated fresh ginger
1/2 tsp red pepper flakes
1/2 cup cashews
 
Directions:
Combine flour and pepper in large zippered bag, add chicken and shake to coat with flour mixture. Heat oil in skillet over medium-high heat. Brown chicken about 2 minutes on each side. Place chicken in slow cooker. Combine soy sauce, vinegar, ketchup, sugar, garlic, ginger, and pepper flakes in small bowl; pour over chicken. Cook on LOW for 3 to 4 hours. Add cashews and stir. Serve over rice.
 
Enjoy!
Laura

5.13.2013

Slow Cooker Week, Day 1

I don't know if you know this, but recently this little cutie entered our lives.


(Just kidding, I knew you knew that, I just wanted to share a super cute picture of her.)

I used to love cooking dinner. It was my time to be creative, decompress, let loose and just relax in the kitchen.

And then I had a baby.

And that basically infinite amount of time I had to cook became a lot shorter depending on when she needed to eat, when she was asleep, when she was awake...you get the idea.

Enter our dinner saver- the slow cooker. (Picture the heavens opening, angels singing and a crock pot falling from the sky.)

I've always been a fan of the slow cooker but have really learned to rely on it over the past few months. This week will all be dedicated to a few of my favorite slow cooker recipes.

Today, I want to share about the Cadillac of slow cookers that I use and a cookbook that I've been loving!

First, my father in law surprised me with this INCREDIBLE slow cooker from Williams-Sonoma a few years ago, The All-Clad Deluxe Slow Cooker.


It cooks evenly and is easy to clean! You can braise or sauté right in the pot over the stove and then set it in the slow cooker to continue cooking. One less pot to clean is fine by me!

It has a great countdown timer and will automatically keep your food warm after the cooking time is over.

Oh and did I mention it's huge?! Seriously. Seven quarts huge. I've even quadrupled the recipe when making apple butter (that's 10 lbs. of apples!) and it handles it like a champ.

 
You can add this to your wish list from Williams-Sonoma here!
 
I've also been slowly trying out recipes from my new cookbook, Slow Cooker Revolution from America's Test Kitchen (aka my new, favorite addiction).
 

All the recipes have been tested and then tested again...and again...and again until they are foolproof for you to recreate at your house! You can order this from Amazon here!
 
Check back this week for lots of yummy slow cooker recipes!
Laura


5.10.2013

Longest Brownie Name Ever

(take a deep breath...)

PB Cup Brownies with Shortbread Crust and PB Glaze.

Imagine how much longer that'd be if I didn't abbreviate peanut butter. Whew.


 Let's work our way from the bottom to the top.

Bottom floor: A Girl Scout cookie Trefoil shortbread crust.
Cookies + Sugar + Butter + Flour =  A crispy match made in heaven.


Middle layer: Fudgy, dark chocolate brownies with miniature peanut butter cups mixed throughout.

Read that again.

Ok, moving on.

Penthouse: A peanut butter, powdered sugar, thick and creamy glaze. Also great on ice cream, cupcakes, spoons, etc.

Move over horse racing, this brownie is the winning trifecta this year.

PB Cup Brownies with Shortbread Crust and PB Glaze
Prep Time: 45 min. (including baking crust)
Total Time: 1 hour, 20 minutes
Yield: 9x13 pan
 
Ingredients:
 
Crust:
12 tbsp. unsalted butter
1/2 c. white sugar
1/2 c. flour
1 c. (1 sleeve) finely ground Trefoil (shortbread) cookies
 
Brownies:
1 box 9x13 size brownie mix (yep!!) and ingredients listed on box recipe
1 c. mini peanut butter cups (or chopped regular size PB cups)
 
Glaze:
2/3 c. powdered sugar
1 tbsp. creamy peanut butter
6 tsp. water
 
First, make the crust. Preheat oven to 350 degrees. Cream the butter and sugar together with a mixer for 3-4 min. Add flour and ground cookies to the mixture and mix until incorporated. Press the mixture into a foil lined and greased 9x13 pan. It will spread out as it bakes so don't worry if it doesn't completely cover the bottom of the pan. Bake for 30 minutes or until lightly brown. Let cool completely.
 
Next, mix together brownie mix as directed. Stir in PB cups. Pour on top of cooled crust and bake as directed on package. Let cool.
 
Lift by foil to remove the brownies from the pan. Mix together glaze ingredients and microwave for 20 seconds or until smooth and pourable. Pour into a Ziploc bag or piping bag and snip the corner off. Drizzle over brownies.
 
Cut and serve!
 
Or cut and keep them all to yourself. I won't tell.
 
Enjoy!
Laura


5.07.2013

Smashed Hot Sweet Potatoes

There are two types of people in this world.

People that actually try out recipes that they pin on Pinterest...and those who don't.

I was totally in the latter category for a while and then I decided I couldn't be that person anymore. I needed to make some changes in my life, starting with cooking things I pin. (Being a little over dramatic here, I know.)

These Smashed Hot Sweet Potatoes were one of the first things I tried and they were a hit! Super easy, flavorful and a nice change from sweet potato fries. Not that I really needed a change from sweet potato fries, those are my fav.

Crispy, sweet and spicy outside, soft, fluffy inside. A match made in heaven...or in your own kitchen!

crash hot sweet potatoes on a plate
 
Crash Hot Sweet Potatoes
Prep Time: 30 min. Total Time: 1 hour
Recipe from The Creekside Cook (lots of great recipes!)
 
Ingredients:
1 & ½ tablespoons light brown sugar
½ teaspoon kosher salt
½ teaspoon ground cumin
½ teaspoon New Mexico chili powder
½ teaspoon smoked sweet paprika
¼ teaspoon onion powder
¼ teaspoon chipotle chili powder
⅛ teaspoon granulated garlic
10 coarse grinds of black pepper
2 medium to large sweet potatoes
2 tablespoons melted butter
2 tablespoons olive oil
 
Directions:
  1. Set a large pan of water with a teaspoon of kosher salt over medium heat until simmers.
  2. Cover a large baking sheet with foil.
  3. In a small bowl, mix together all of the dry spices, and set aside
  4. Peel the sweet potatoes, and cut into 1 & ½ inch thick slices.
  5. When the water is simmering, add the potato slices and cook for around 10 minutes, until the slices are getting a little soft. (Make sure they are soft enough to mash!)
  6. Remove the slices to a cooling rack. You can leave them on the rack until they cool off and the outsides are dry, or if you are in a hurry, blot all of the moisture from the surface of the slices. This is important – they have to be dry on the outside or they won’t get crispy.
  7. Start the oven preheating to 400º
  8. Lay the slices of sweet potato on the prepared pan, and use a water glass to gently compress each slice – you want them to flatten out and the edges should get kind of ruffly.
  9. Mix the butter and oil together.
  10. Using a pastry brush or the back of a spoon, spread a thin layer of the oil and butter mixture on each slice.
  11. Sprinkle some of the spice mixture over each slice, and press onto the surface lightly so that it sticks to the potato slices.
  12. Gently turn oven each slice, and repeat the oil/butter and dry spice application as you did on the first side.
  13. Roast in the oven for about 15 minutes, until the bottom of the slices is getting caramelized and crispy.
  14. Carefully flip over each slice and roast another 10 minutes or so, until both sides are crispy and the spice mixture has melted together and turned all nicely brown.
  15. Serve!
Enjoy!
 
Now to start trying out my work-out pins...
Laura


5.03.2013

Friday Funny

Charlotte was about two weeks old when I called my mom and said, "Taking care of a baby is oddly similar to taking care of a drunk person. They constantly are drinking, they spit up all over themselves and poop and pee whenever."

Well, lo and behold, the internet world agrees with me.

Click here to see the 26 reasons kids are pretty much just tiny drunk adults.

#6, #7 and #18 are my favorites, what's yours?
Laura

5.01.2013

Super Smoothie

You don't realize how loud the blender is until you have a baby and they look at that strange machine like, "What the heck is that thing and why is it so horribly loud?!"

Little does she know that she has the potential to be even LOUDER than a blender full of ice. And she has proved that fact, too.

Y'all know I've always been a fan of smoothies for breakfast, lunch, snack, really anytime of the day. After having a baby that didn't weigh the 23 pounds that I had somehow gained when I was pregnant, I'm an even bigger fan of smoothies. They're filling, nutritious and simple to throw together quickly and drink while I'm loving on my sweet girl....or changing a diaper, cleaning up spit-up or collapsing on the couch after she goes down for a nap. You get the idea.


This smoothie will not disappoint. Made creamy with a frozen banana, made sweet with mango and almond extract and packed with flax (great for nursing moms!) and fresh spinach!


I adapted this recipe from skinnytaste.com and she mentioned she saw it in a Superfood Smoothie book (see here) that has peaked my interest! I'm always looking for yummy, new smoothie recipes!


Mango Banana Spinach Smoothie
Adapted from SkinnyTaste.com
Makes 1 Smoothie
 
Ingredients:
1/2 frozen banana
1/4 c. frozen (or fresh) mango
1/2 c. fresh spinach
1 tbsp. ground flax seeds
1 small splash (approx. 1 tsp.) almond extract
1 c. milk
1/2 c. ice
 
Blend all ingredients together until smooth and creamy.
 
Enjoy!
Laura

4.29.2013

Baked Spaghetti Squash and Cheese

Supposedly all you have to do is cut a spaghetti squash in half, drizzle it with EVOO, roast it in a 375 degree oven for about an hour and you can pull a fork through the guts and make little spaghetti that are actually SQUASH! Say whaaattttt?

Y'all, it's true! I've tried it and it couldn't be simpler!

You can toss it with pasta sauce and add a chicken breast but how blasé would that be! (Blasé aka bland, boring, beneath your taste buds). But, if you do want to do that some night, I'm totally not judging.

Once you make SkinnyTaste's Baked Spaghetti Squash and Cheese, though, you will understand how blasé the first option sounds.

Strings of spaghetti squash, mixed with onions, spinach and made creamy with cups of cheddar cheese and sprinkled with Parmesan. And baked until bubbly. The hardest part of this recipe is cutting the spaghetti squash. (Seriously, does anyone else struggle with this? It's a job for my hubby.)

 
It's a low-fat, veggie-rich dish that tastes so decadent you'd never know it was skinny!
 
Move over mac and cheese, there's a new dish in town.
Laura

(P.S. That last line re: the mac and cheese makes me giggle.)

4.26.2013

I'm baaaaccckkkkk!

Y'all. I've been MIA for a while. I realize that. And, believe me, I have the most adorable, cuddly, precious, perfect excuse.


 Meet Charlotte. She was born November 1, 2012 and she has made our lives fun, busy, sometimes overwhelming but always joyful.

I'm not going to sugarcoat it- babies are a LOT of work. I know, I know, you already knew that...well take your expectation of how much work they are and then multiply that by, oh about, 185%. Then add 10. Whew. So, long story short, that's why I've been gone.

I've had so many encouraging comments from some of you that I was missed. You have no idea how much that meant to me. This little ol' blog started as a creative outlet for me and it felt really great to know that other people enjoy yummy food, fun crafts and funny Friday jokes as much as I do.

I've had urges the last six months to blog again but they quickly are distracted with a dirty diaper, a baby smile or giggle and usually rarely with the desire obligation to take a shower. (Yikes.)

I've been waiting to blog again until I really missed it. And I do. I miss sharing with y'all. Gosh, that's a good feeling.

I can't promise that I will blog daily. And I can't promise that I will take lots of food pictures. And I might just link you straight to the recipe and use their pictures (giving them credit, of course).

But, I can promise that your kitchen will be full of yummy dinners and sugar filled desserts again. I can promise that you might be inspired to get crafting on a Saturday afternoon. I can promise that you will laugh at silly videos, most likely of Sophia Grace and Rosie. Those are good promises that I plan to keep.

I also promise this won't turn into an all baby, all the time blog. But I can't promise that sometimes a picture or video of our sweet girl won't turn up on here. Y'all, she's just so stinkin' cute!

So, in summary, thanks for waiting for me. It feels good to be back.

Get your spatulas ready for scrumptious recipes comin' at ya next week.
Laura

(So, the post ends here. But for a cute bonus, keep scrolling...)